Impacted by Covid-19? We’re here to help.
In light of the significant impact and ongoing uncertainty around the Coronavirus pandemic, please know that your well-being and financial needs are our top priorities. With that in mind, we have taken steps to ensure that you have access to the services and personalized support that you may need to manage your student loan account.
- Anytime Access: Your loan servicer, University Accounting Service (UAS), provides 24/7 access to view your student loan information and make payments at www.uasconnect.com. Payments by mail should be sent to University Accounting Service, PO Box 5865, Carol Stream, IL 60197-5865. For more information on making payments, please read the Making a Payment section on this page.
- Personalized Support: If you have additional questions regarding your student loan account, or are experiencing difficulties at this time and need to discuss repayment options to keep your account in good standing, please call 800-723-2210 to speak with UAS representative.

Quorum uses a third-party vendor to process all of your student loan payments – UAS (University Account Service). If you would like to see further information about UAS, visit www.uaservice.com. Here, you’ll find instructions and information on registering and paying your loans through the eUAS Borrower Portal.
Creating an Account
Creating an Account
Learn, step-by-step, how to register on the eUAS Borrower Portal and then activate your new account. Plus, understand what you’re agreeing to when you sign the TCPA.
Registration
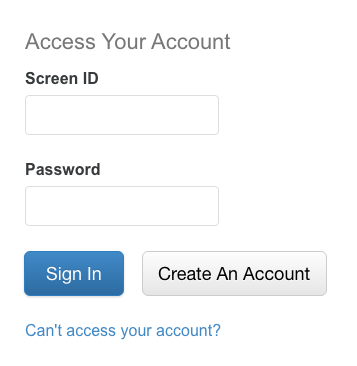
Getting Started
- You can begin the enrollment process from the eUAS Borrower Portal.
- At the eUAS login screen, select Create An Account.
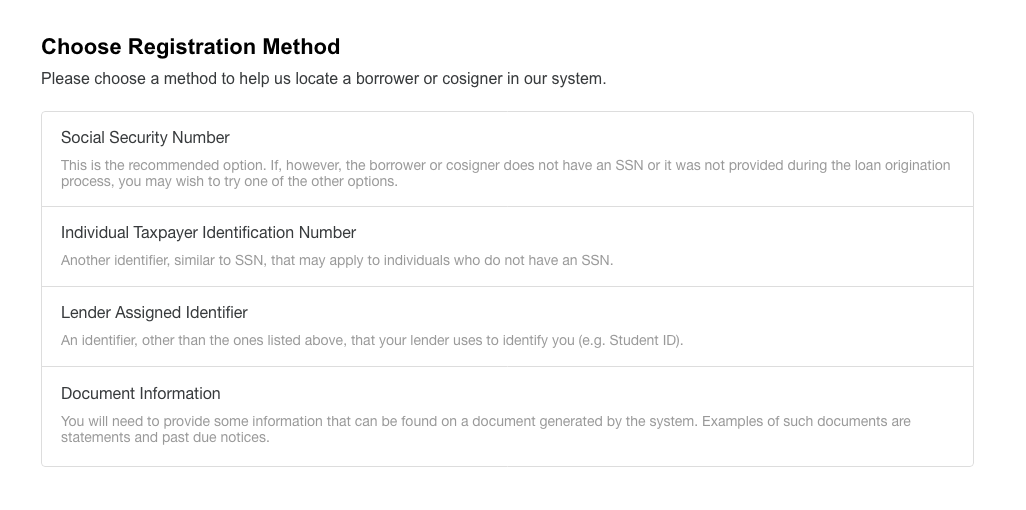
Choose a Registration Method
Multiple registration methods are available:
- Social Security Number
- Individual Taxpayer Identification Number
- Lender Assigned Identifier
- Document Information
Registering by Social Security Number is the recommended option. If the borrower or cosigner doesn’t have an SSN, then you can use one of the other three options.
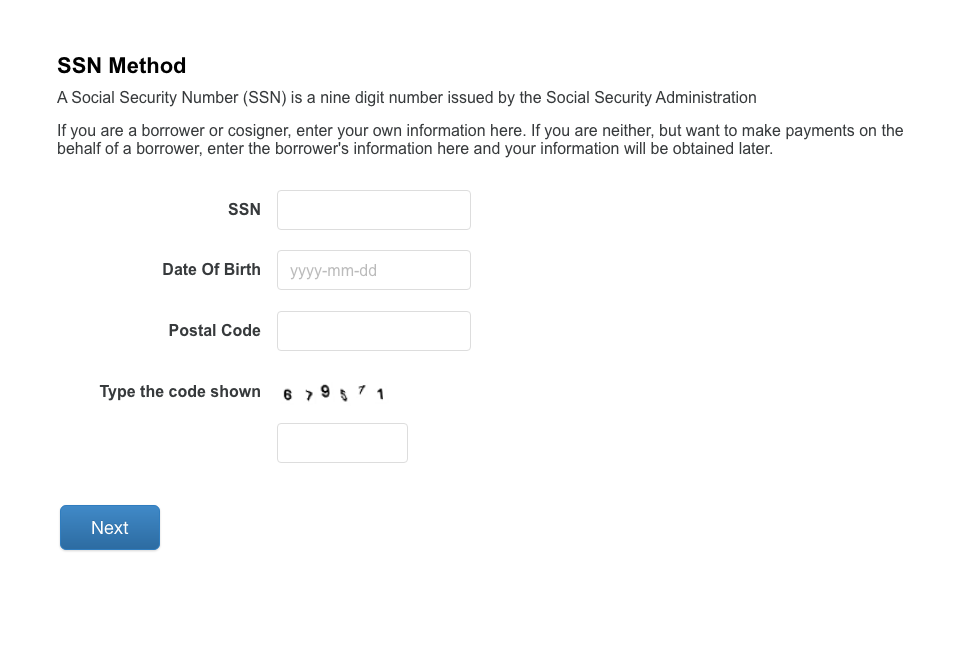
Registering by SSN
A Social Security Number (SSN) is a nine digit number issued by the Social Security Associations. You can find your SSN on your Social Security Card. If you don’t have your Social Security Card, you may be able to find your SSN on other paperwork including: tax documents (W-2 or 1099), company payroll documents, military identification card, medical insurance card, etc.
Whether you are the cosigner or the borrower, enter your own information. If you are neither, enter the borrower’s information and your information will be obtained later.
The SSN method requires:
- Your 9-Digit Social Security Number
- Date of Birth
- Postal Code
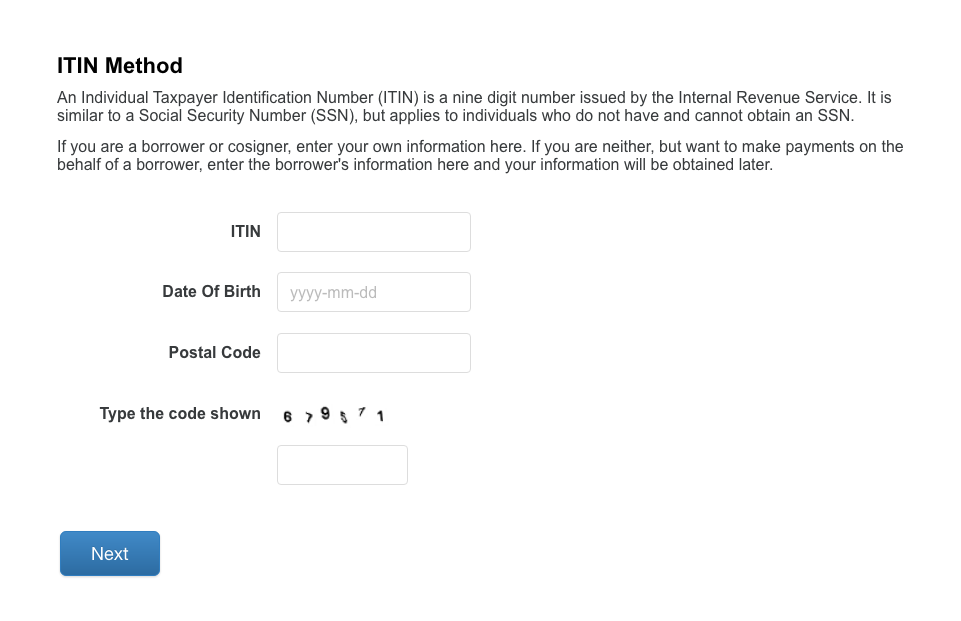
Registering by ITIN
An Individual Taxpayer Identification Number (ITIN) is a nine-digit number issued by the Internal Revenue Service. It is similar to a Social Security Number (SSN), but applies to individuals who do not have and cannot obtain a SSN.
Whether you are the cosigner or the borrower, enter your own information. If you are neither, enter the borrower’s information and your information will be obtained later.
The ITIN method requires:
- Your 9-Digit Individual Taxpayer Identification Number
- Date of Birth
- Postal Code
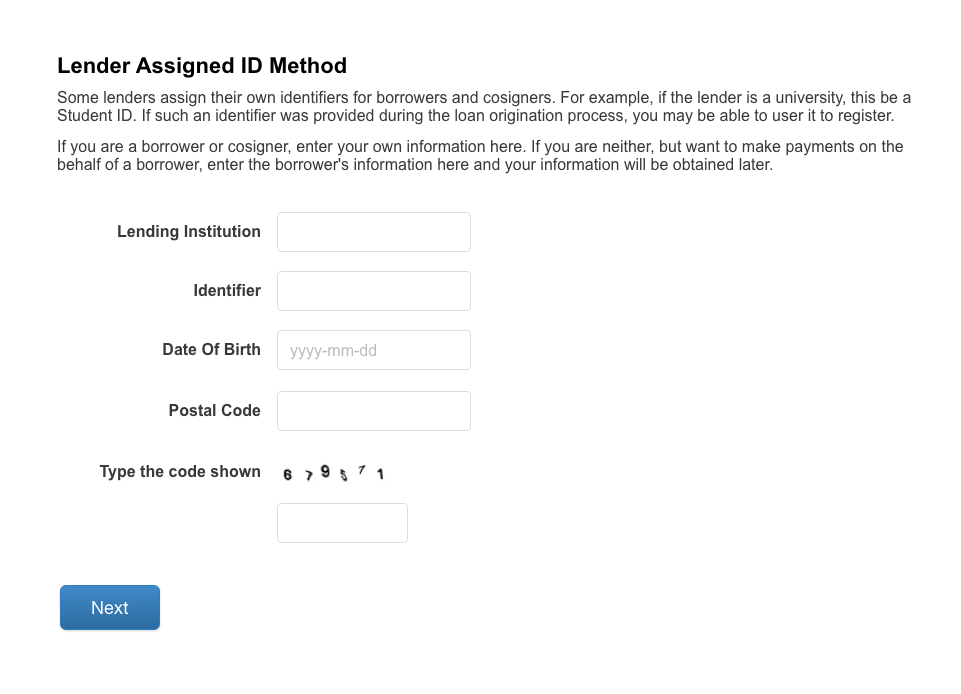
Registering by Lender Assigned ID
Some lenders assign their own identifiers for borrowers and cosigners. For example, if the lender is a university, this could be a Student ID. If such an identifier was provided during the loan orientation process, you may be able to use it to register.
Whether you are the cosigner or the borrower, enter your own information. If you are neither, enter the borrower’s information and your information will be obtained later.
The Lender Assigned ID method requires:
- Name of the lending institution
- Identifier
- Date of Birth
- Postal Code
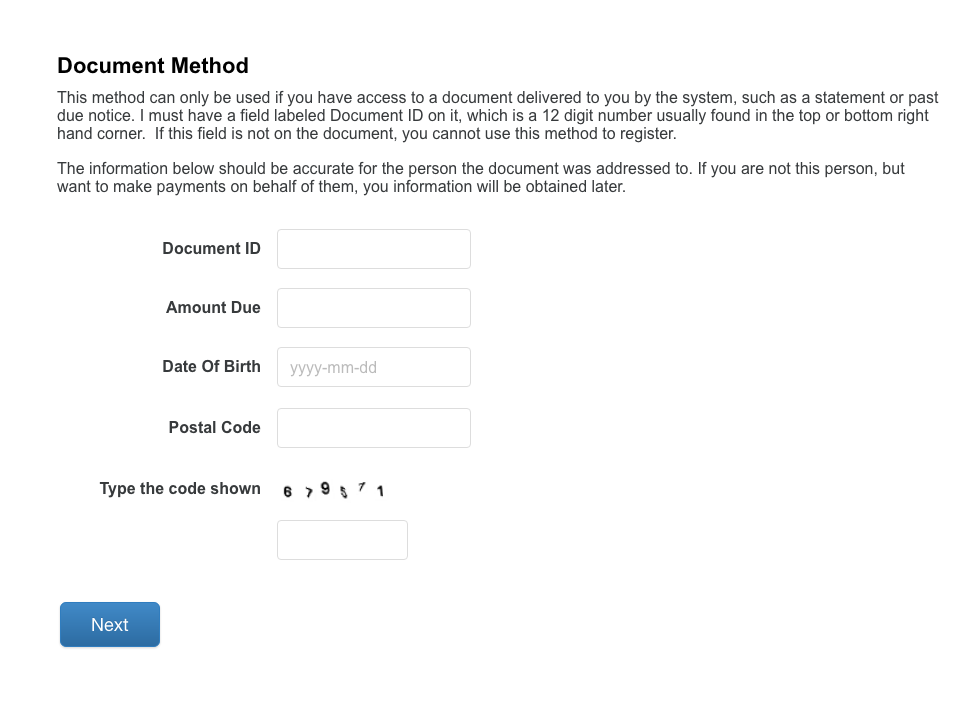
Registering by Document
This method can only be used if you have access to a document delivered to you by the system, such as a statement or past due notice. It must have a field labeled Document ID on it, which is a 12-digit number usually found in the top or bottom right hand corner. If this field is not on the document, you cannot use this method to register.
Whether you are the cosigner or the borrower, enter your own information. If you are neither, enter the borrower’s information and your information will be obtained later.
The Document method requires:
- The document ID of a statement or past due notice
- Date of Birth
- Postal Code
Registration Process
1. Enter your information into the required fields.
2. Complete the CAPTCHA verification step and click Next.
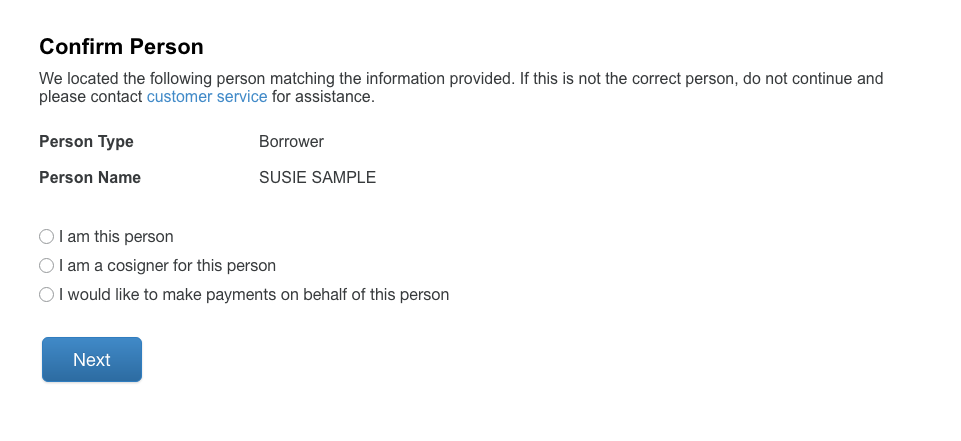
3. The system will locate a person based on the information you provided in the previous steps. Confirm that the system matched with the correct person. Note: if there is an error in the name of the borrower, you can email cuscoperations@studentchoice.org.
4. Select one of the options below to indicate who you are and then click Next.
Borrowers and cosigners initiate registration independently. A payer must be authorized by the borrower before registration is allowed. A person is allowed one active online registration. If they attempt to create a second registration, an error message is displayed:
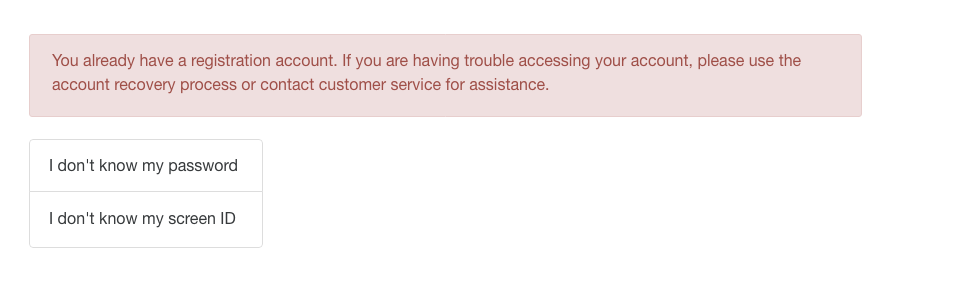
If you already have an account, but do not remember your password and/or your screen ID, there is an account recovery option under the error message.
5. Fill out the account information section and then click Create Account.
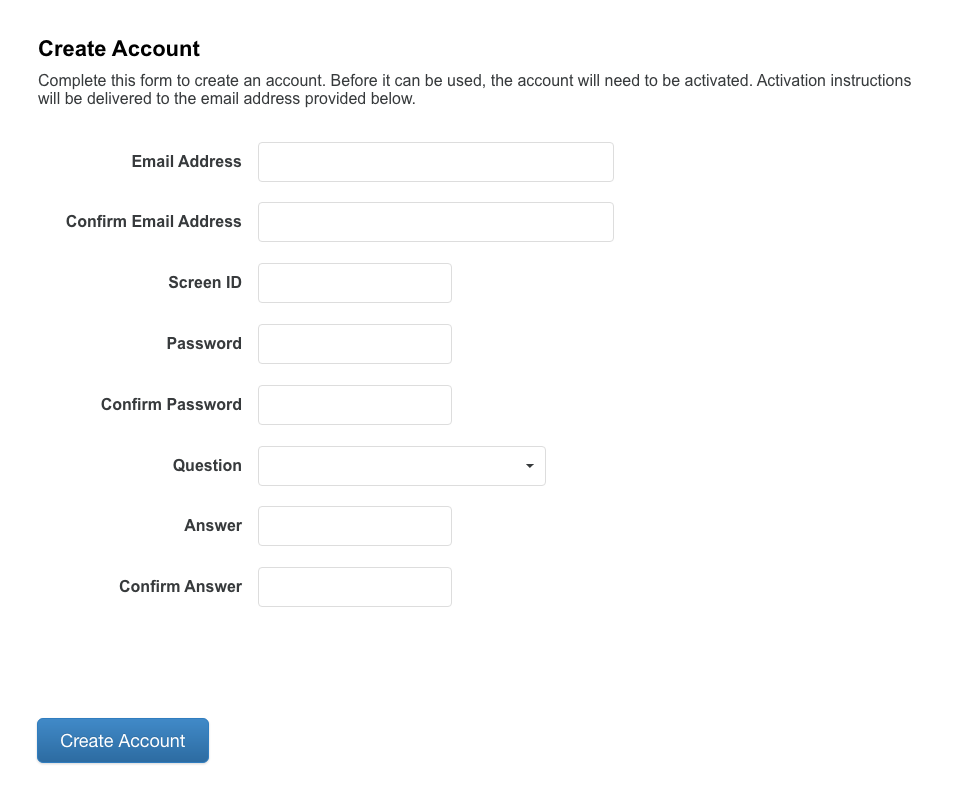
Your password must be 8 to 32 characters long.
Before the account can be used, it must be activated. Account activation instructions will be sent to the email address that you provide in this section.
Activate / Verify Your Account
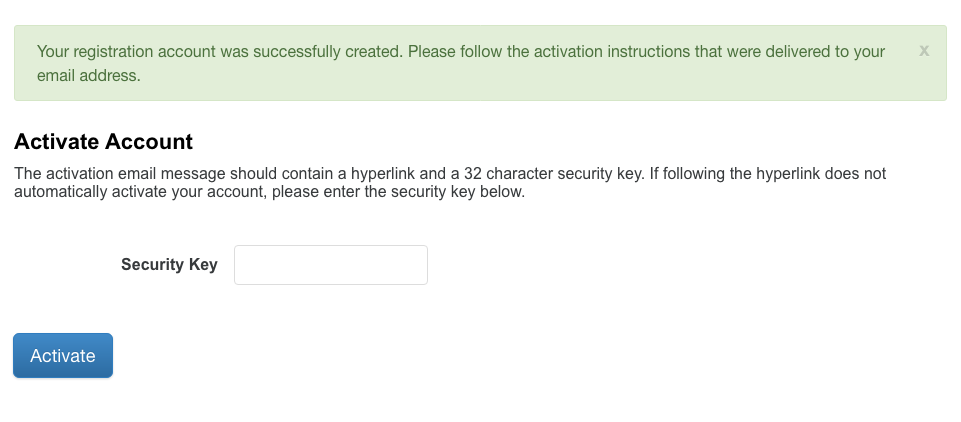
Check Your Email for the Activation Link
To ensure the email address provided during enrollment is valid and delivery from UAS is not flagged as spam, the system sends an activation email. The email contains an activation link and, alternatively, a security key that can be entered manually.
Click the activation link in the email or enter the security key and then click Activate.
Verification
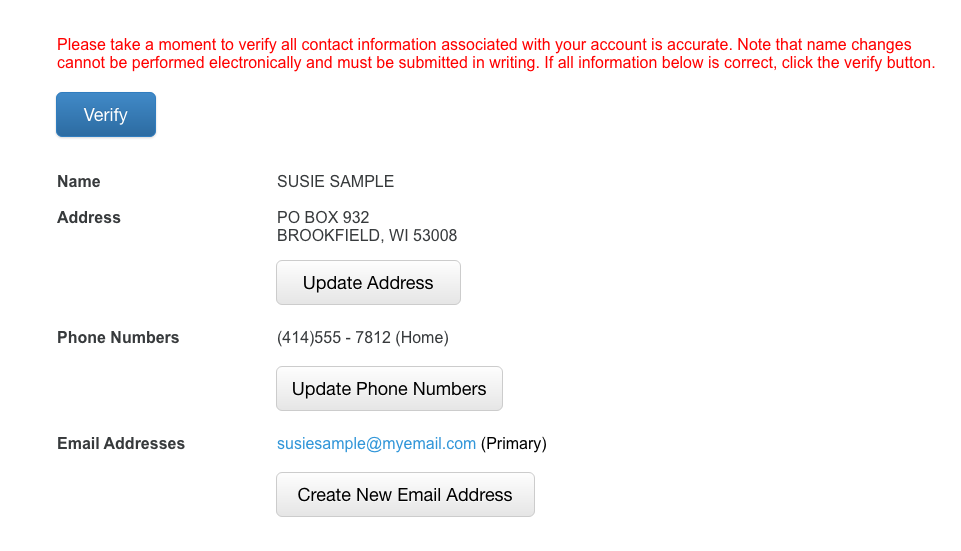
Upon enrollment and every 90 days thereafter, UAS prompts for address, phone and email verification. Updates immediately apply to the Loan Manager site.
If there are errors or you want to change the information for Address, Phone Number, or Email Address, just click on the designated button.
Note: if there is an error in the name of the borrower, you can email cuscoperations@studentchoice.org.
Take a moment to make sure all of the information is correct and then click Verify.
TCPA / Document Delivery
Telephone Consumer Protection Act (TCPA) Agreement
Although UAS does not currently use dialer equipment or text message cell phones, they may in the future.
Accepting the agreement means that you are giving consent to receive phone calls or text messages regarding your loan. You can read the full details of the agreement in the eUAS Borrower Portal.
Make your selection and then click Confirm.
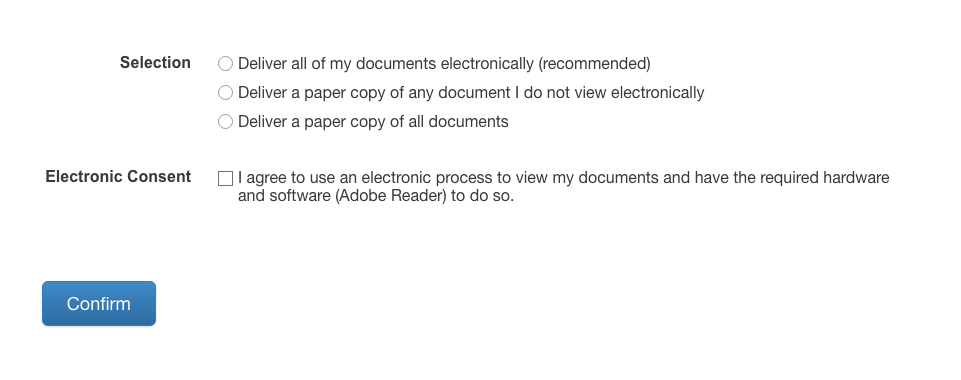
Document Delivery
Electronic Signatures in Global and National Commerce Act (ESIGN, Pub.L. 106–229, 114 Stat. 464, enacted June 30, 2000, 15 U.S.C. ch. 96) requires certain disclosures and consent. Borrowers must agree to the statements on this page and select their preferred method of document delivery.
It is recommended that you get all of your documents delivered digitally, but you have the option to receive paper copies of the documents. You need Adobe Reader software to view the electronic documents.
You can change these preferences at any time. To do so, sign in and click on Settings. Use the Update Document Delivery link to change your preferences.
Select a document delivery option and then check the Electronic Consent box before clicking Confirm.
Making a Payment
We break-down all of the types of payments available on the eUAS Borrower Portal so that, as you create your first payment, you can follow along with these instructions.
eCheck Payment
Selecting Payment Method
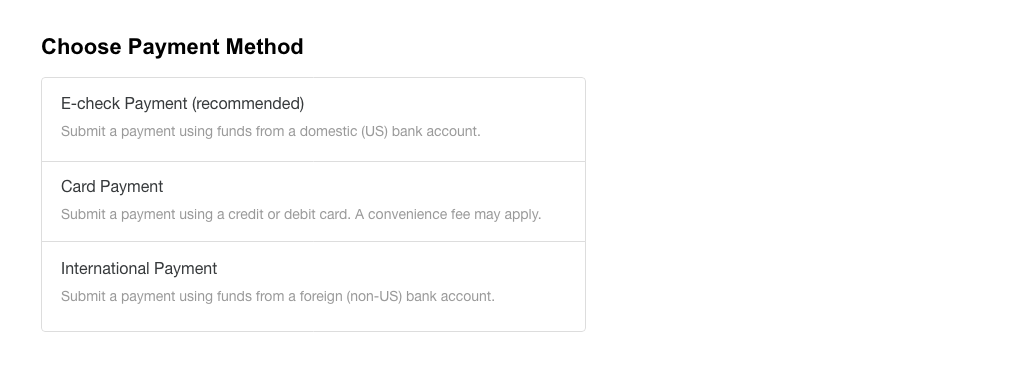
After selecting Create New Payment in the Payments dropdown, you have a choice of payment methods: eCheck payment is recommended. With the eCheck method, you’ll submit your payment using funds from a domestic (US) bank account.
The eCheck Payment method requires:
- Account Holder Name
- Account Type (Savings or Checking)
- Bank Routing Number
- Account Number
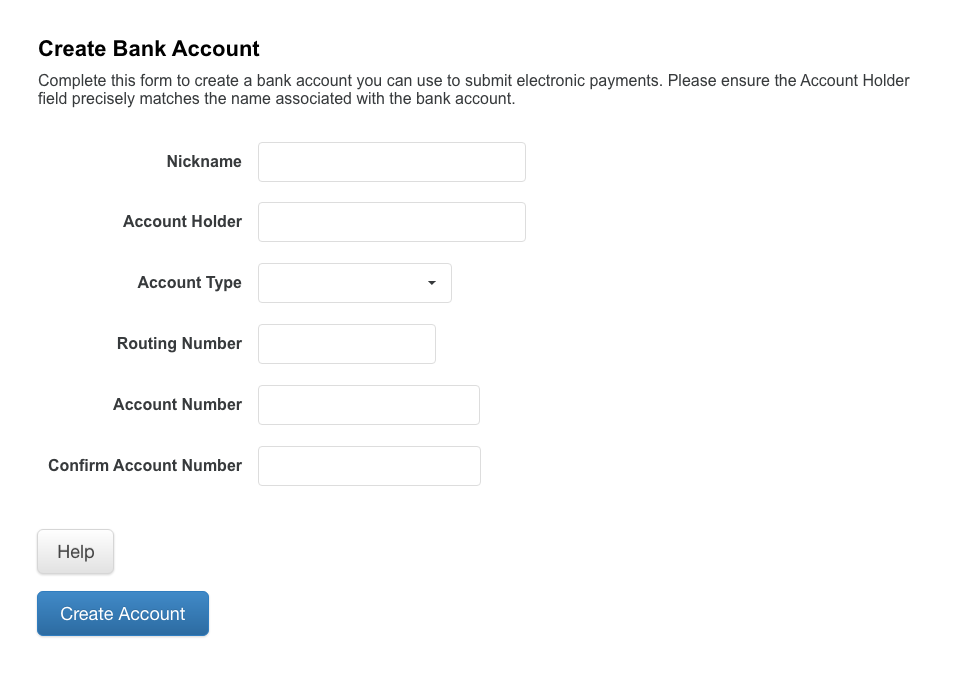
Creating a Bank Account
For the eCheck method, a bank account must be created to indicate where to draw funds from. You can use a checking or savings account. Multiple bank accounts are permitted. The borrower is prompted to create a bank account when they attempt to make their first online payment.
Payment Details & Confirming Payments
Next, you’ll create a payment. The payment date defaults to today; however, it can be set up to 30 days in to the future. Payments are submitted on the next banking day but credited to the loan based on the payment date.
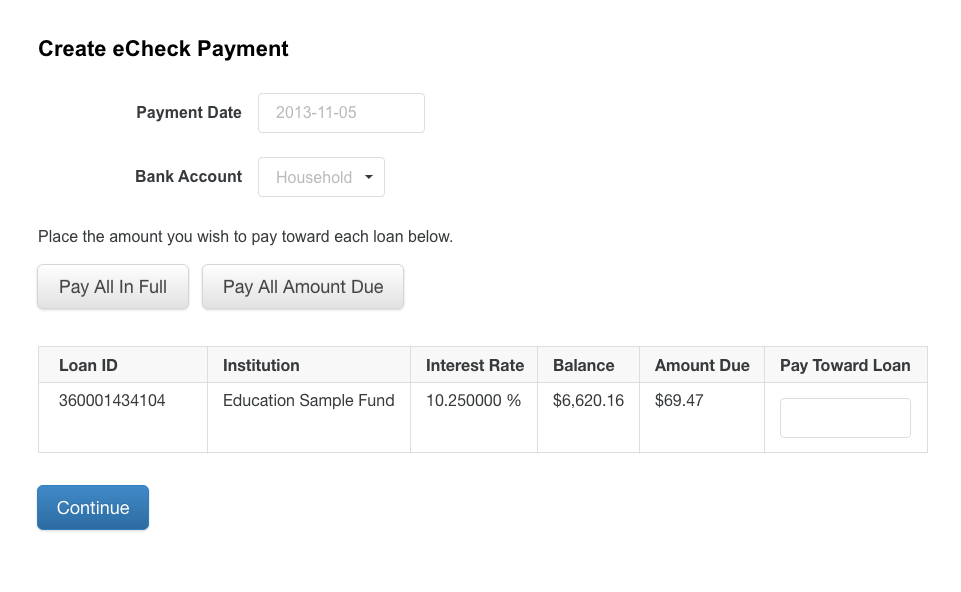
Select the bank account you want to use to pay. You can create several bank accounts and then select the one you want to use as you make a payment.
A borrower can designate a single payment to allocate to specific loans if more than one loan exists. A pre‐fill option for Pay All in Full, or Pay Amount Due is available, or type a specific amount in the Pay Toward Loan box.
The payment request must be confirmed before it is scheduled for ACH submission.
Please note: It takes 24 hours to process a payment. If the payment is received Friday after hours, it will process on the next business day. If the payment is received on a holiday, it will process on the next business day. If an electronic payment is made before 1:00 PM EST, the payment will be posted the same day. If the electronic payment is received after 1:00 PM, the payment will be posted the following business day. For setting up recurring electronic payments, please submit your request at least 7 business days prior to the payment due date.
After clicking Continue, you will be able to confirm the payment details in the next step. Confirm that the Bank Account, Payment Date, and Amount are correct and then click Confirm Payment.

By clicking on Confirm Payment, you authorize UAS to deduct the total amount from the designated bank account on the date indicated or next banking day. Do not click Confirm Payment more than once or duplicate payments may occur.
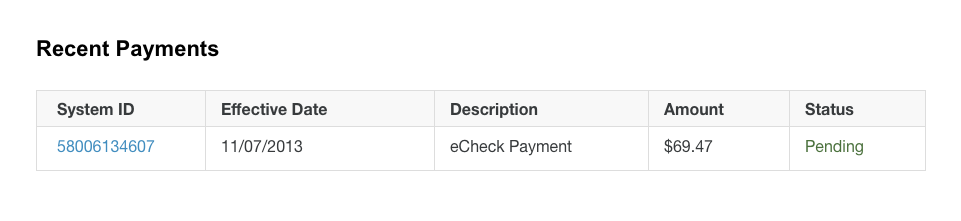
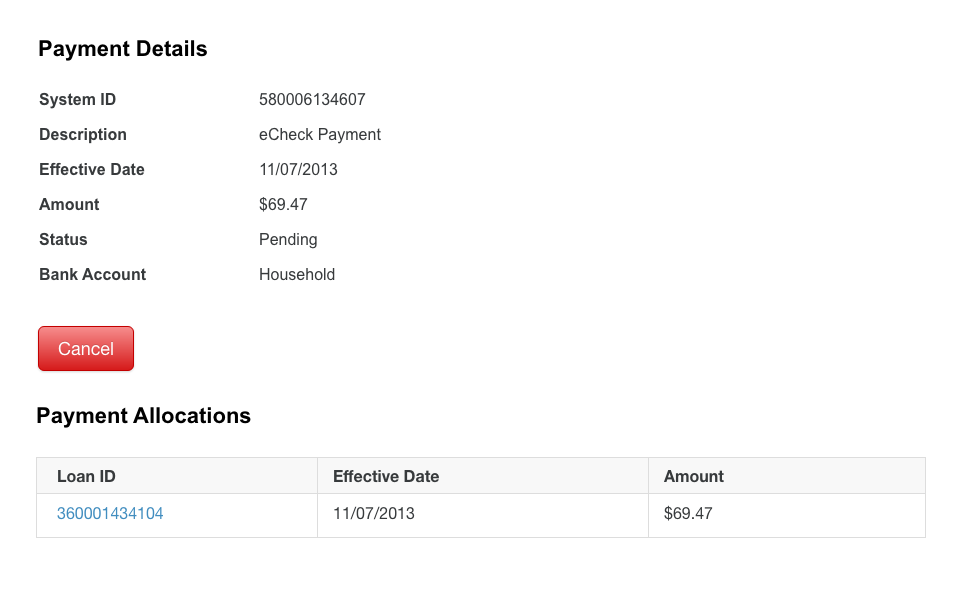
After the payment is successfully created, you can view the details and status under the Payments dropdown on Recent Payments page. From there, you can review payment details and cancel a payment if necessary.
Credit Card Payment
Create a New Card Account
Complete the form to create a card account. Once created, you can use it to submit payments for eligible loans. The name and address information on the form must match the billing information for the card provided. After you’ve filled out the form, click Create Card Account.
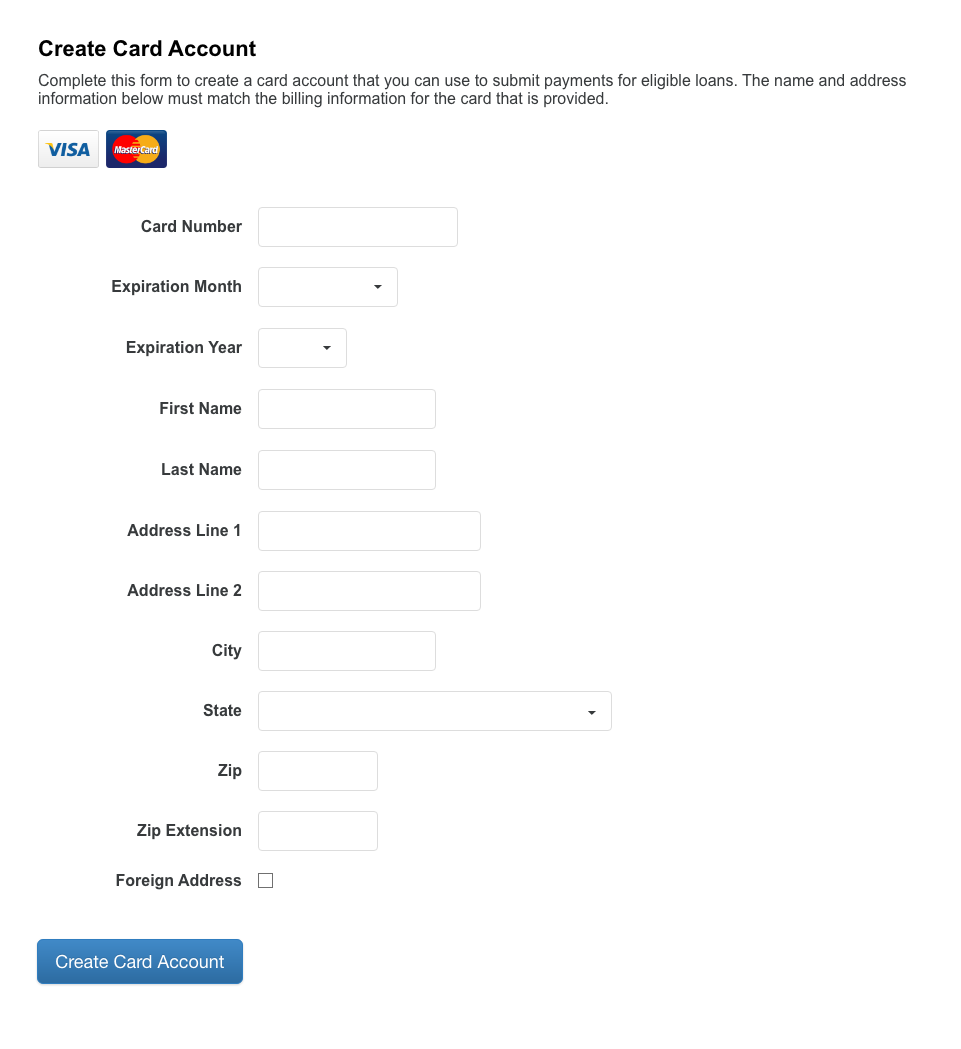
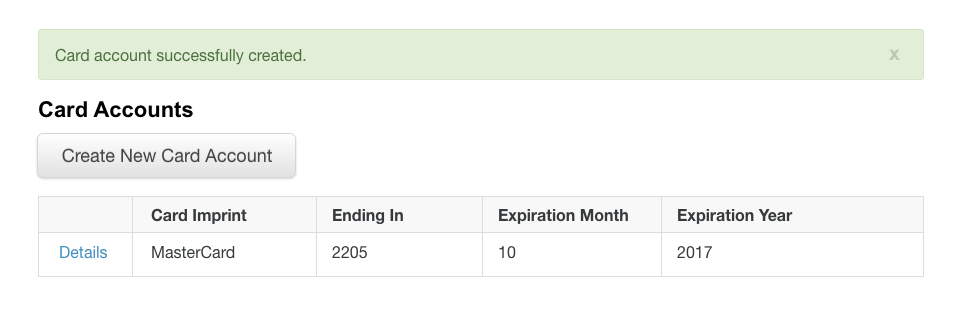
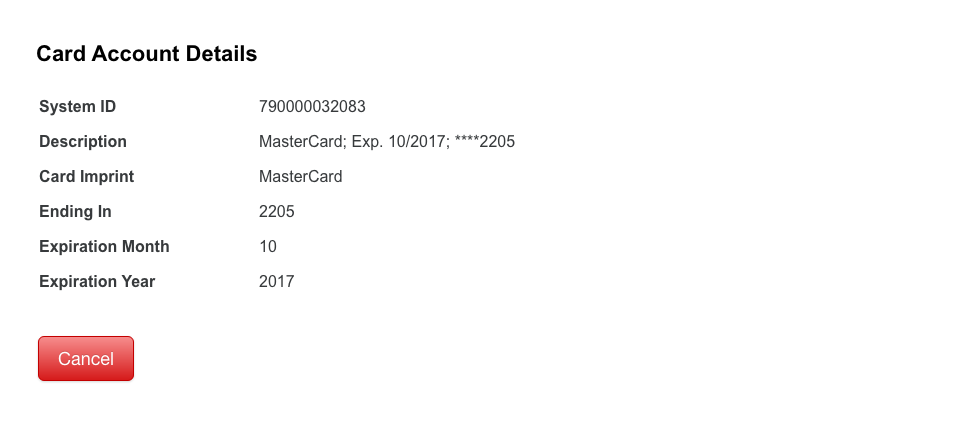
Your new card account will be displayed under Card Accounts. To review the information on the card account, you can click Details. You can also delete your card account from the Card Account Details.
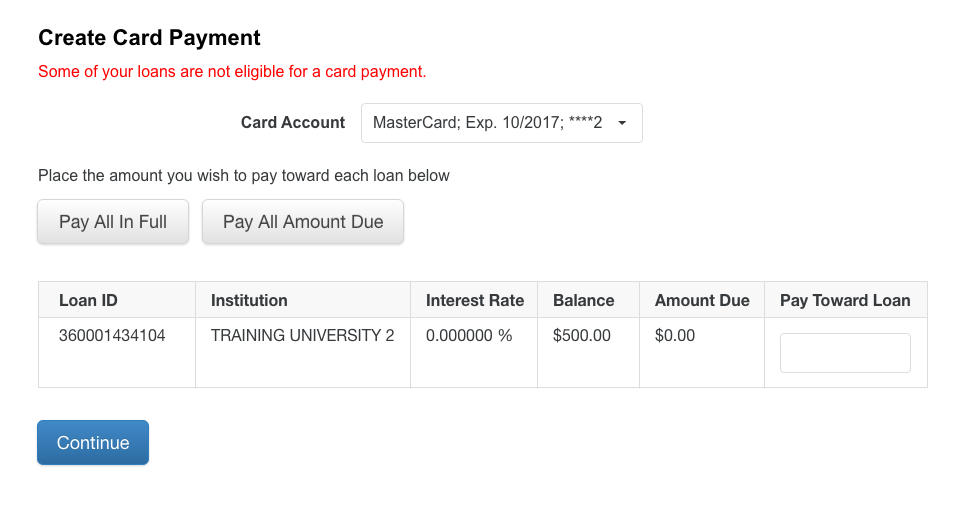
Create Card Payment
A borrower can designate a single payment to allocate to specific loans if more than one loan exists. A pre‐fill option for Pay All in Full, or Pay Amount Due is available, or type a specific amount in the Pay Toward Loan box.
Click Continue once you have chosen your card and the loan you want to pay.
Not all loans are eligible for card payments.
Confirming a Card Payment
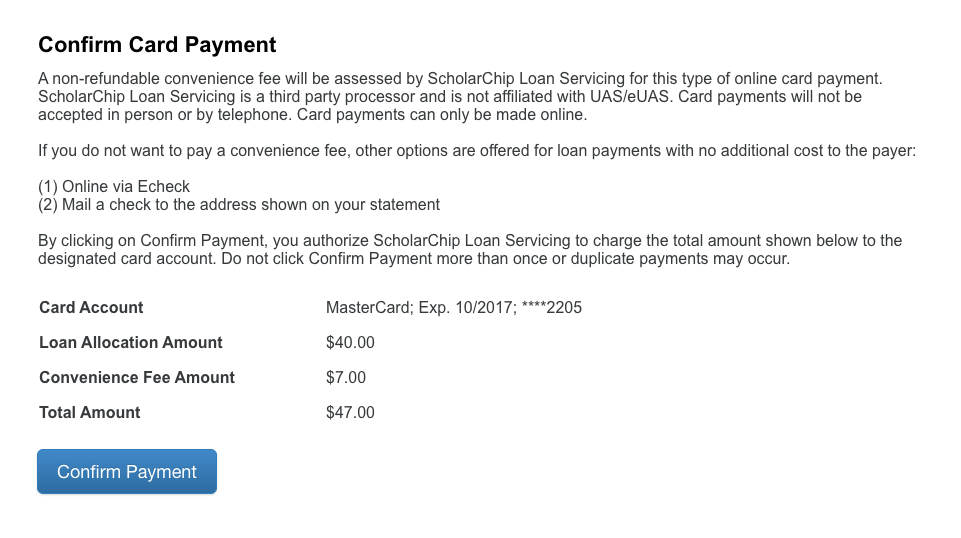
A non-refundable convenience fee will be assessed by ScholarChip Loan Servicing for the online card payment. ScholarChip Loan Servicing is a third party processor and is not affiliated with UAS/eUAS. Card payments will not be accepted in person or by telephone. Card payments must be done online.
If you don’t want to pay the convenience fee, other options are offered for loan payments with no additional cost to the payer: Online via eCheck or Mail a check to the address shown on your statement.
You will have to review the payment details and confirm they are correct. If you agree to the fee and your details are correct then click Confirm Payment. Do not click Confirm Payment more than once or duplicate payments may occur.
If the payment is unsuccessful, then the below message will be displayed:

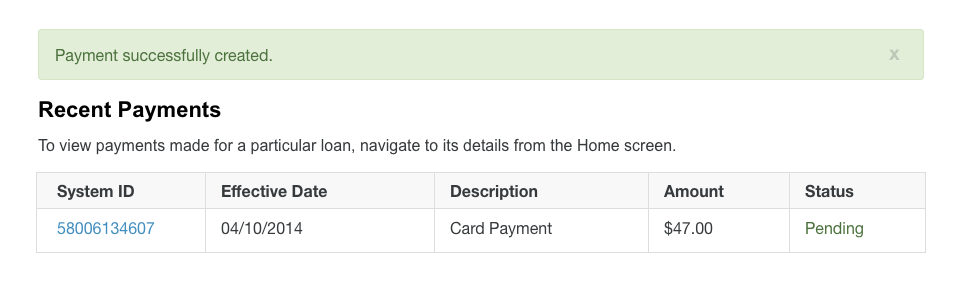
If the payment is successful, then the below message will be displayed:

After the payment is successfully created, you can view the details and status under the Payments dropdown on Recent Payments page. From there, you can review payment details and cancel a payment if necessary.
International Payment
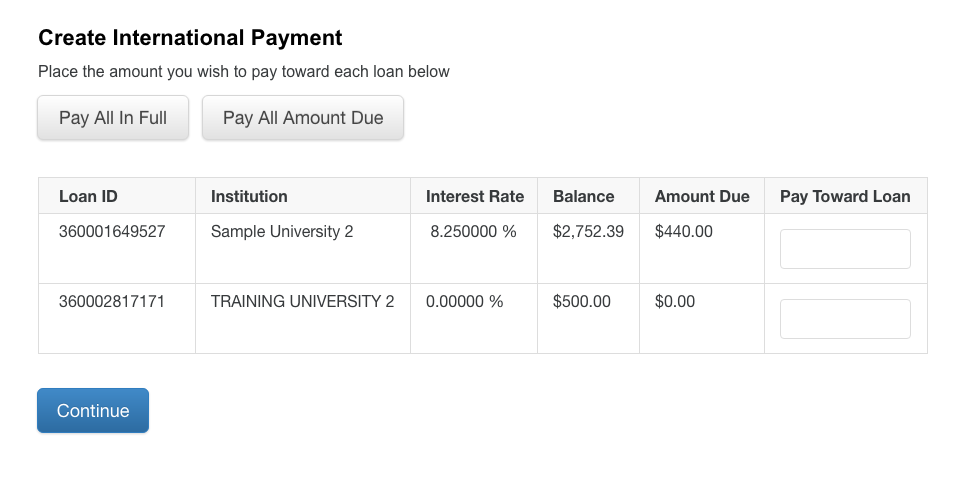
Create an International Payment
A borrower can designate a single payment to allocate to specific loans if more than one loan exists. A pre‐fill option for Pay All in Full, or Pay Amount Due is available, or type a specific amount in the Pay Toward Loan box.
Click Continue once you have chosen your payment amount and the loan you want to pay.
Confirming an International Payment
UAS has a third party vendor to provide you with a low cost method of making international payments toward your loan(s). You will be redirected to their site to complete the payment creation process. International payments can take several days to process. We will credit your account on the date that we receive the funds.
Before continuing, please ensure that your browser is configured to allow popups from our site.
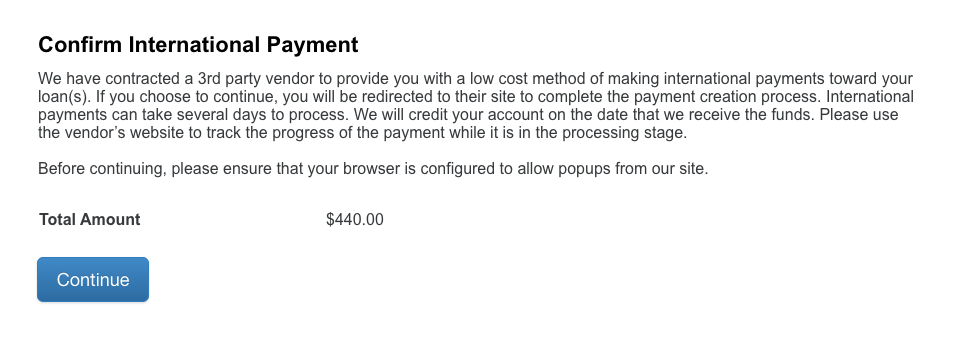
After clicking Continue, a new window or tab should open in your browser. Complete the process on the vendor site. If another window or tab did not open, then your browser may have popups disabled. To proceed, you will need to enable popups for this site. The message below will appear after clicking continue.

Continuing on the Third Party Site
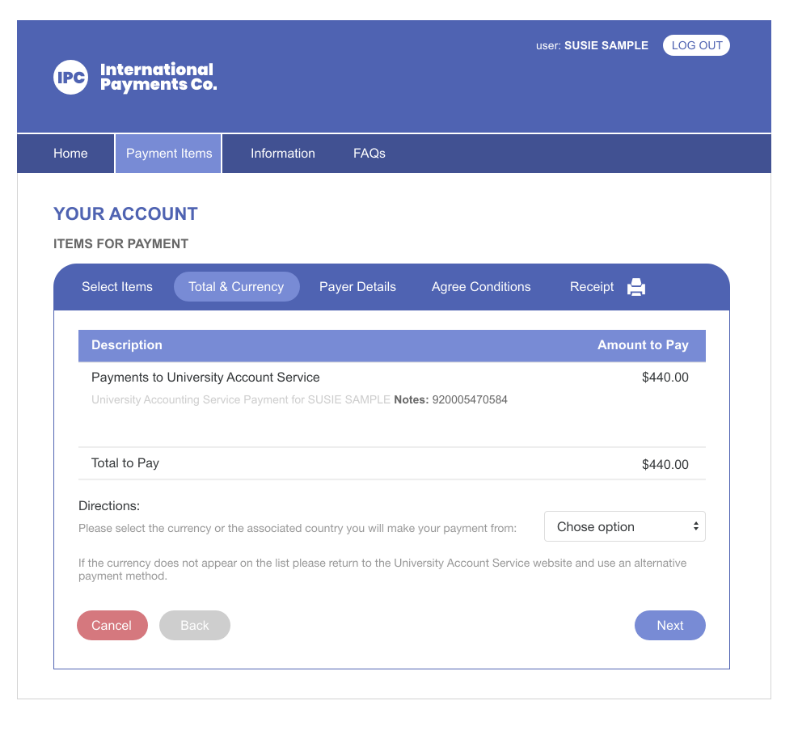
Total and Currency
After you are redirected to the third party site, you will have to continue the process there. First select the currency associated with the country you are making a payment from. If the currency you are looking for is not on the list then return to the UAS website and choose another payment method.
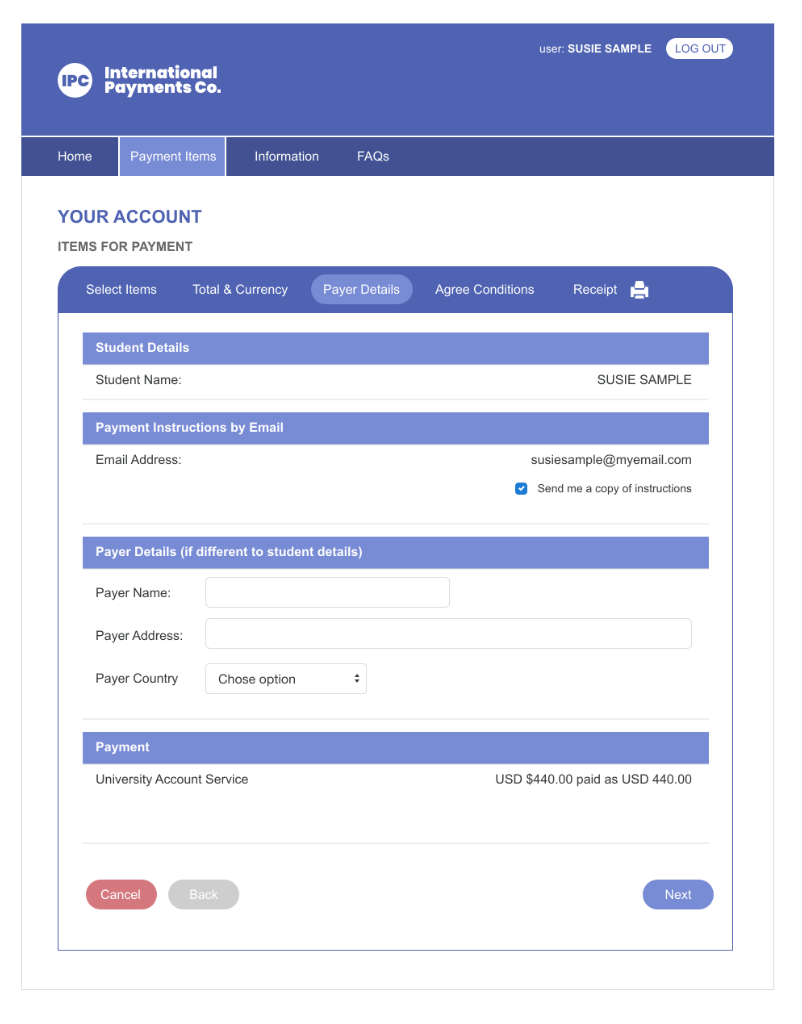
Payer Details
Click Next to continue. Fill out the required details. Check the box and enter your email address if you’d like to be sent an email with the bank settlement instructions.
Enter the payer details (if different form the student details, then enter the full details of the payer in the boxes).
Check to confirm that the payment amount is correct. Click Next to continue.
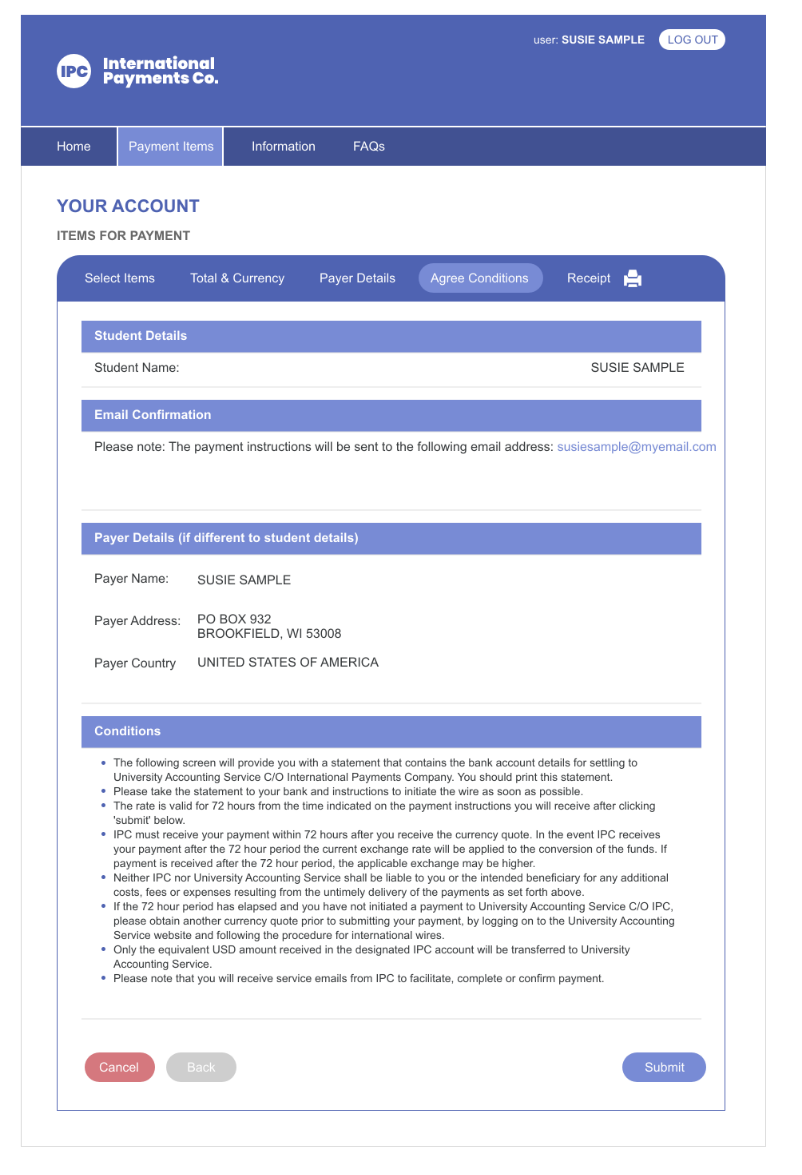
Agree Conditions
Confirm that the details you previously entered are correct. Click the checkbox after you’ve read the conditions and understand them.
Bank Settlement Instructions
After completing the form, you’ll be sent a PDF with the bank settlement instructions to the email you provided in the previous step.
You can either:
- Print the form and take it to your bank to set up an electronic payment.
- Transfer funds by electronic payment via your online banking service.
- Transfer funds by electronic payment via calling your bank directly.
If you have any questions you can contact Western Union Business Solutions at studentinquiries@westernunion.com or toll free at 1-877-218-8839.
Recurring Payments
Creating a Recurring Payment
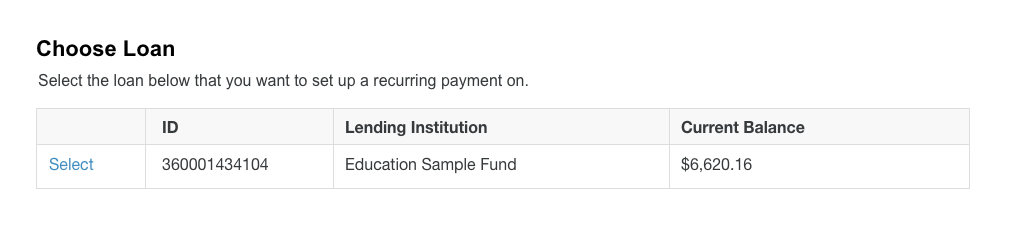
Unlike a one‐time payment, recurring payments must be created on a loan-by-loan basis. To create a new recurring payment, go to Payments on the main menu and select Recurring Payments. A list of your active loans are displayed. You can choose which loan you’d like to set up a recurring payment on by clicking Select.

The recurring payment will start on the First Payment Date specified in the form. The payments will continue based on the interval selected. Please submit your request at least 7 business days prior to the payment due date to allow time for processing.
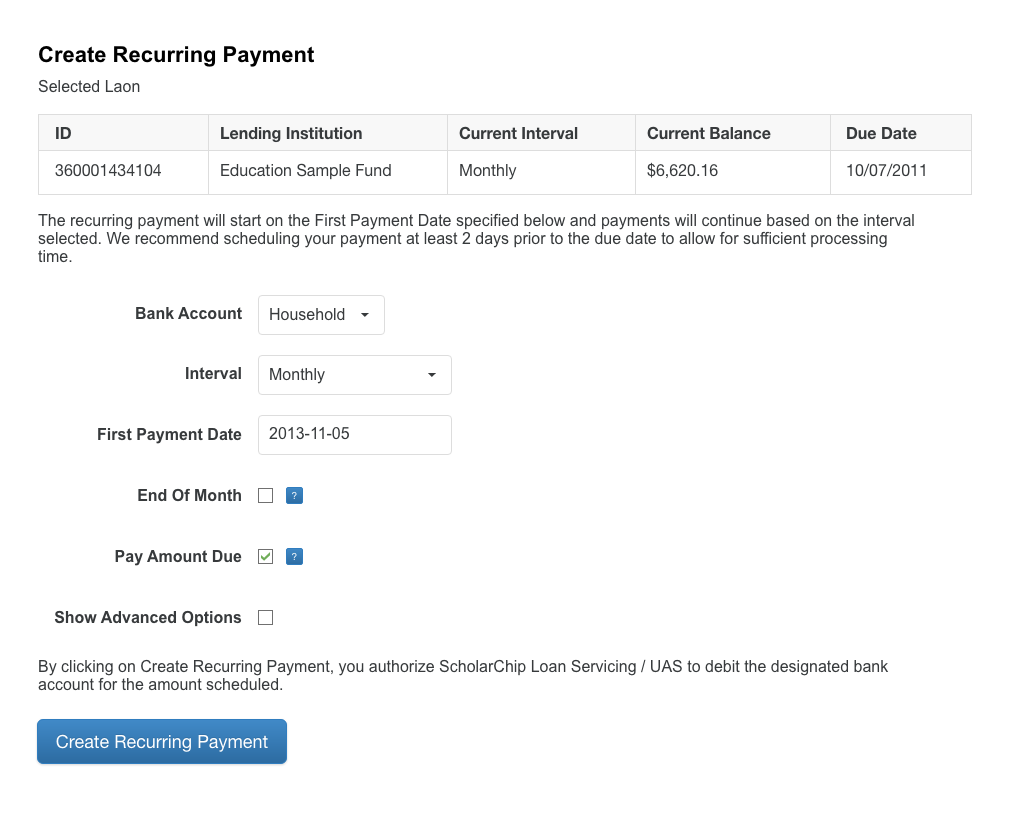
Select Show Advanced Options to display further payment parameters. To learn more about a field on the form, you can click the question mark icon.
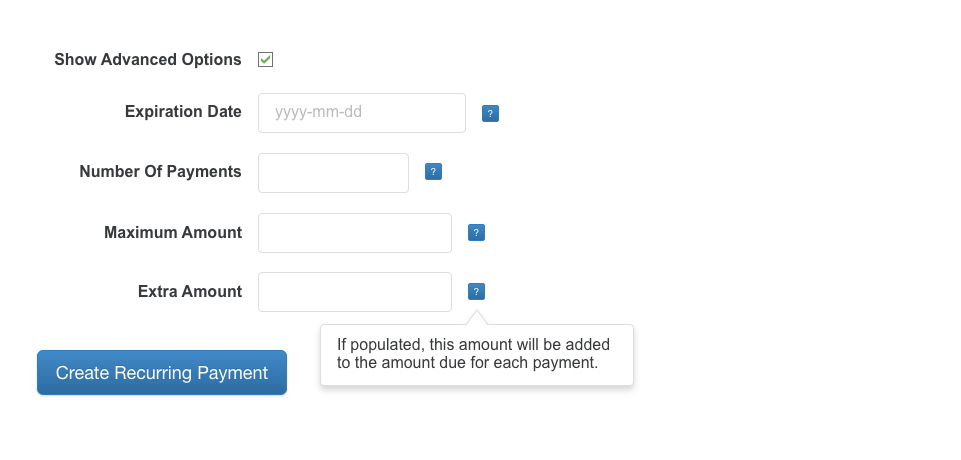
By clicking on Create Recurring Payment, you authorize ScholarChip Loan Servings / UAS to debit the designated bank account for the amount scheduled.
View payment details and upcoming scheduled payments or cancel your recurring payment from the Recurring Payment screen.
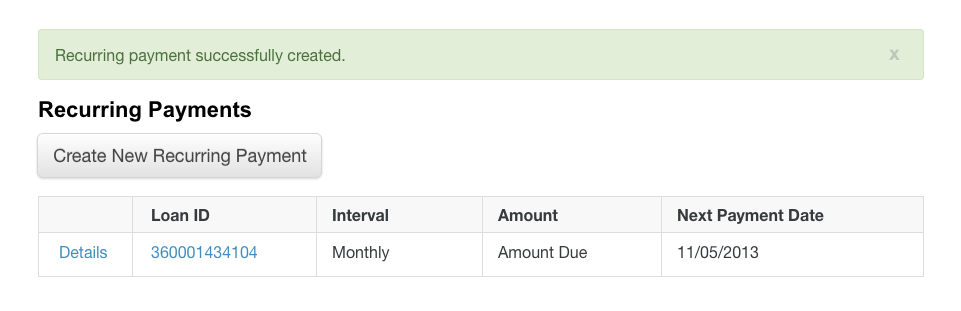
Clicking on Details next to a specific loan will let you see all of the payment details. You can also see all upcoming scheduled payments.
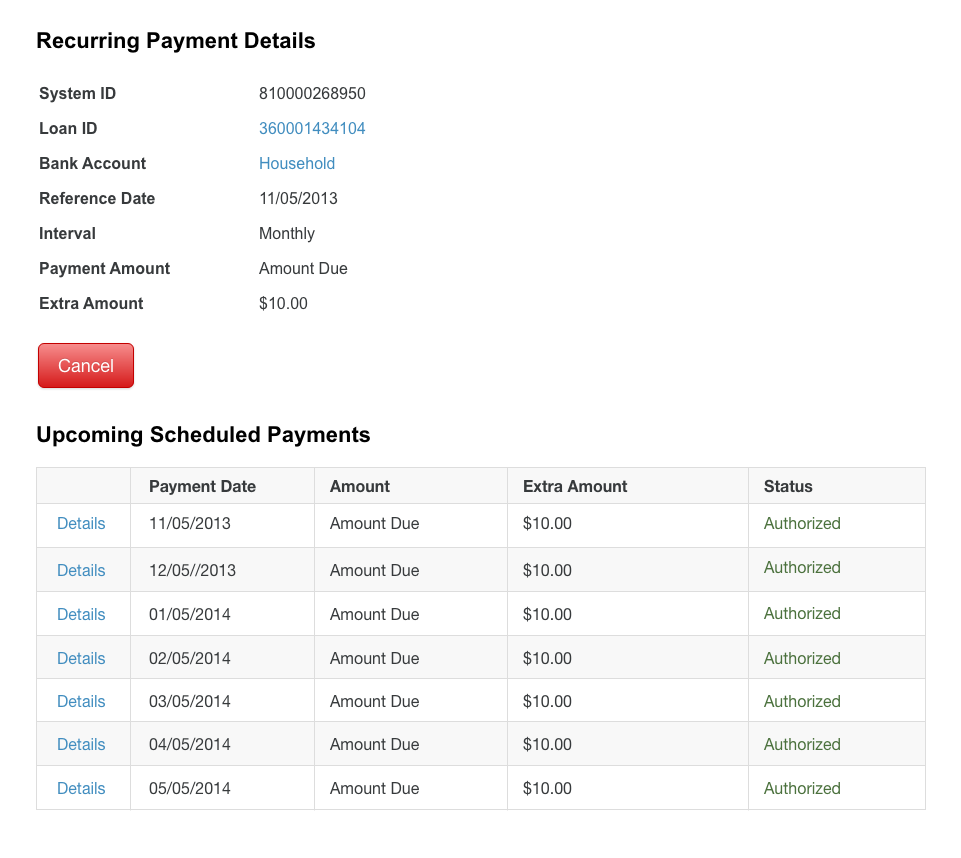
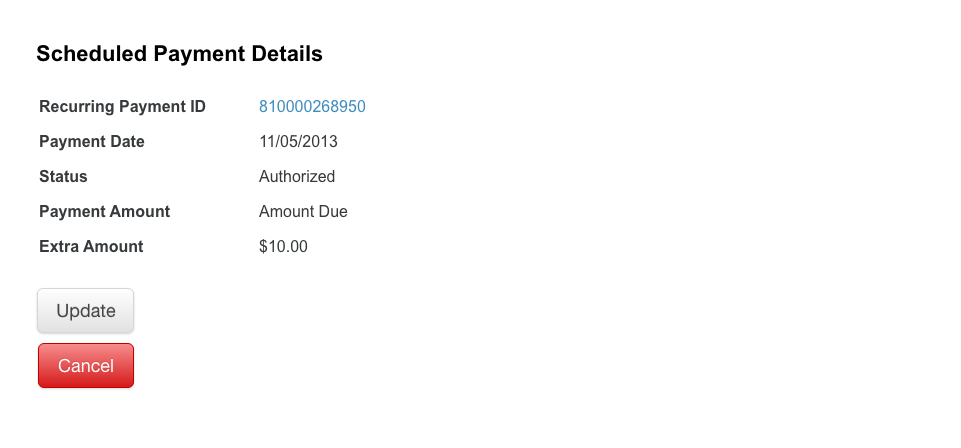
You can select any of the upcoming schedule payments to reveal further details about the payment or cancel the payment.
Cancelling a Payment
Recent Payments
To cancel a payment, go to Recent Payments under the Payments dropdown on the main menu. You’ll find a list of your recently made payments. If the status is Pending, then you are able to cancel.
Please note that the notification for canceling a pending ACH payment should be made at least 5 business days prior to the scheduled payment date. If a payment is not pending and a check or wire has been sent/processed, the payment would not be able to be cancelled.
To cancel, click on the System ID of the payment you want to cancel.
You’ll be brought to the Payment Details. At the bottom of the page, there is a Cancel button.
After you click Cancel, you will be prompted to confirm the cancel request.
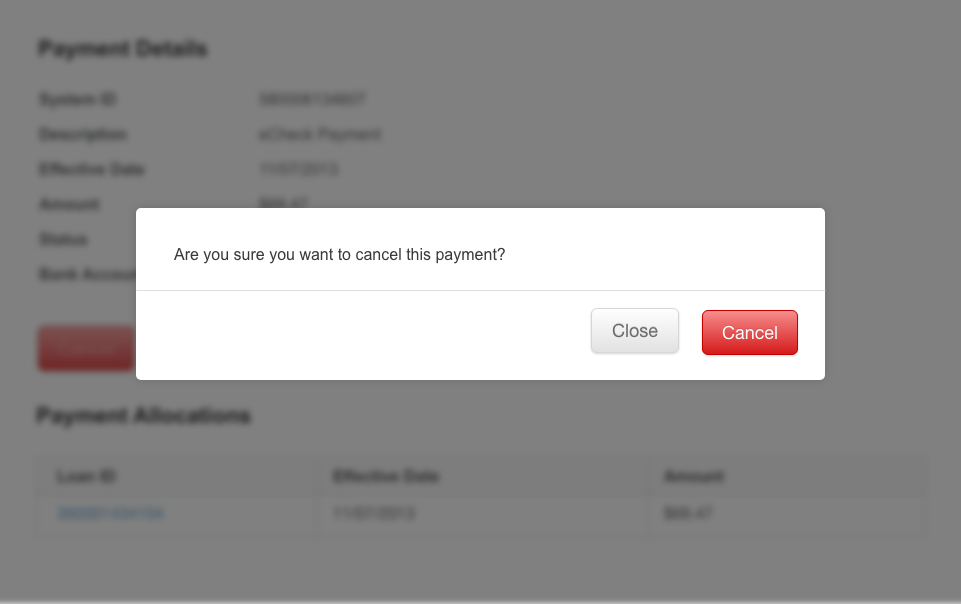 /div>
/div>
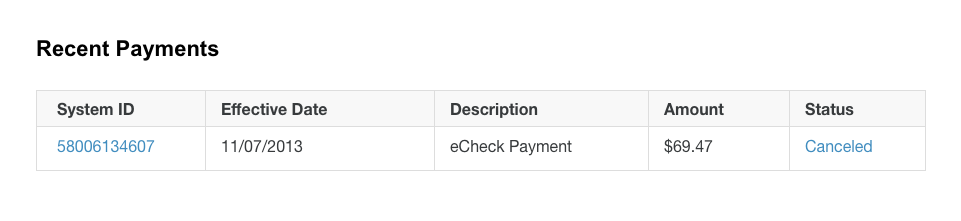
Once the cancel has successfully gone through, the status of the payment should read as Canceled.
Navigating the Platform
Having trouble finding what you need on the eUAS Borrower Portal? Take a look at the sections below to view a detailed description of each main menu item.
Home
What does the homepage look like?
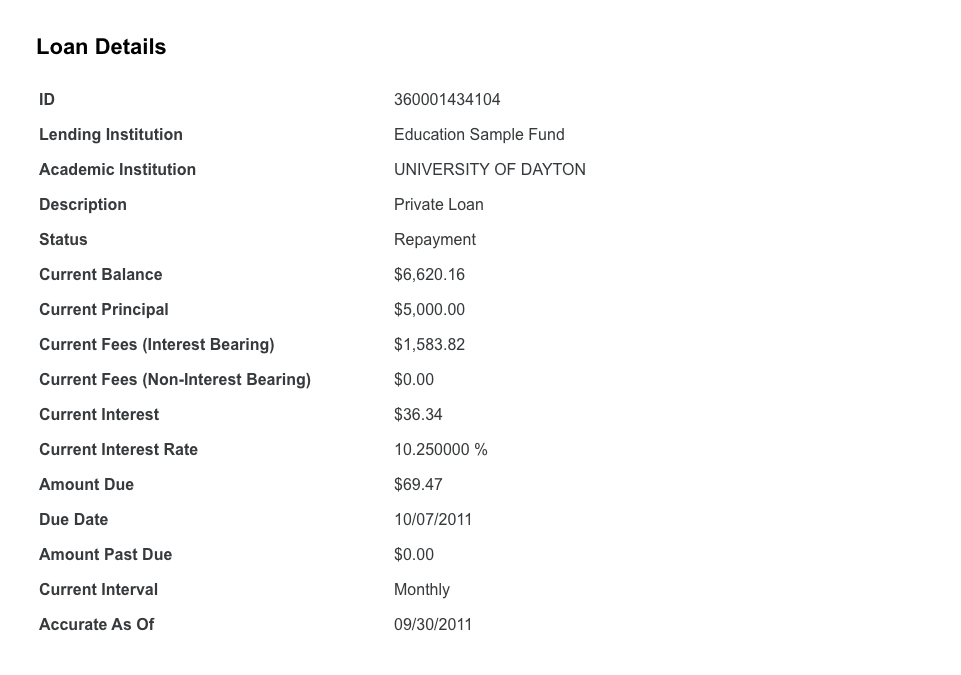
You can get to any page you need from the top navigation bar. Seasonal and important site messages are displayed under the primary navigation. All loans are displayed on the homepage — you can quickly see all of your loan details.
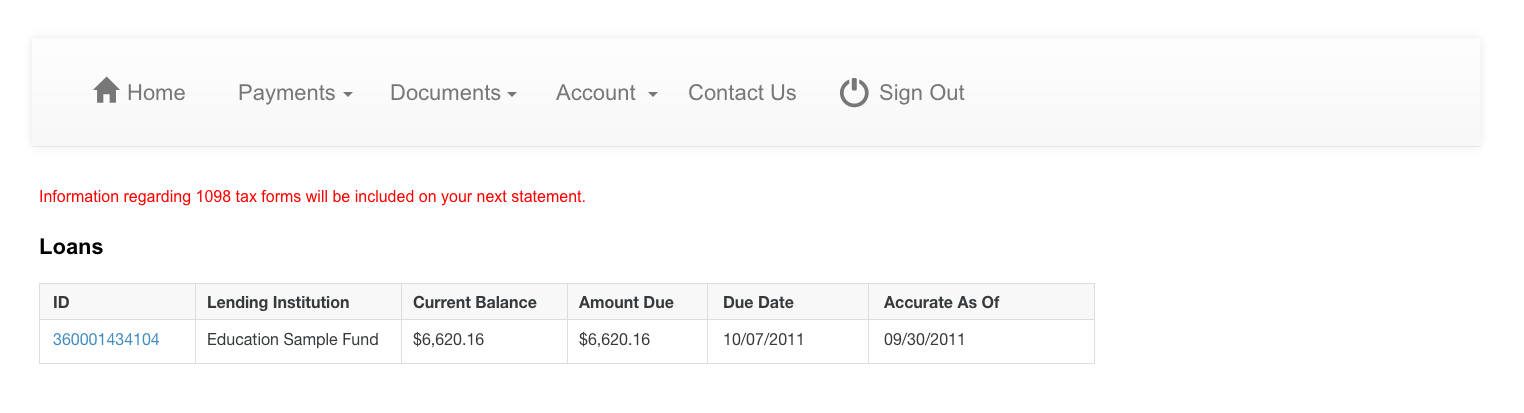
To get further information on a specific loan, just click the Loan ID link.
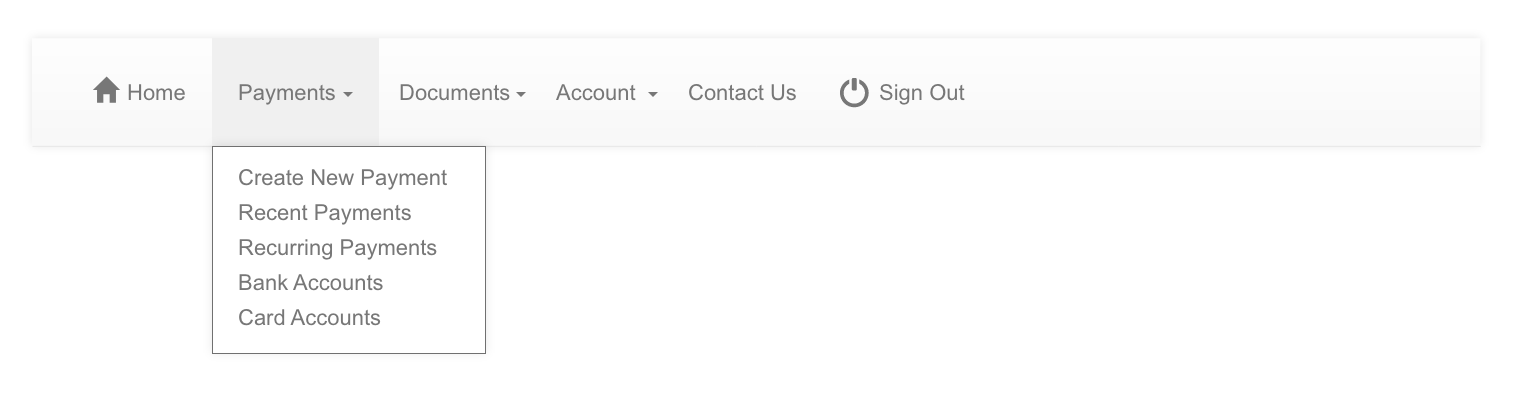
Payments
What can I do from the Payments menu?
Under the Payments dropdown, you can create a new payment, browse your recent payments, see details about your recurring payments, and update your bank account(s) and card account(s) information. For more details about how to make a payment, go to our Making a Payment section.
Recent Payments
You can view your recent payments from the Payment menu. You’ll see a list of your payments organized by date. If the status is Pending, you can cancel the payment. For further details, view the Canceling a Payment section. To see more information on the payment, click on the System ID number.
Documents
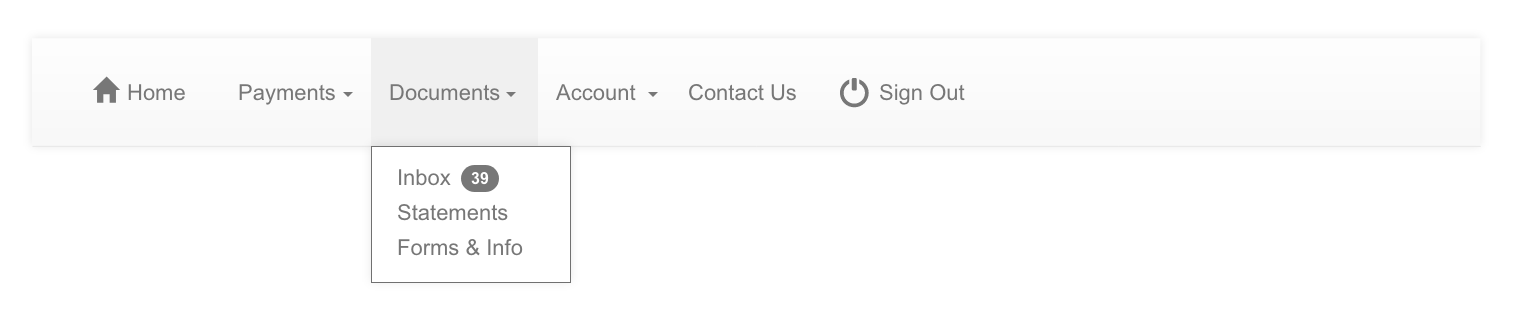
Inbox
Under the Documents dropdown, you can access your Inbox. There will be a number displayed next to your Inbox, which indicates how many messages you have. There, you’ll find any alerts or important updates regarding your loan(s) or account.

Statements
After you click on Statements, you’ll be brought to a page that lists statements organized by date —you can view them by clicking View on the corresponding document.
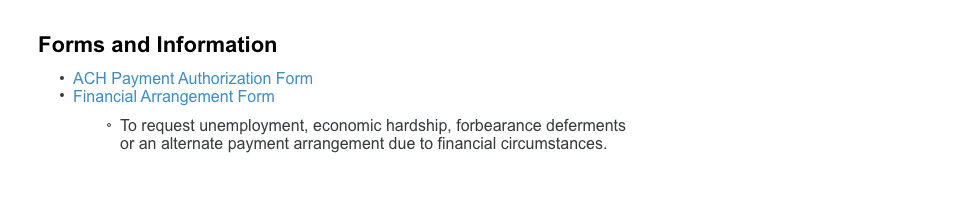
Forms & Info
Here, you’ll find a list of all of your loans — you can click Select on a specific loan to get more information and see the available forms related to it.
Account
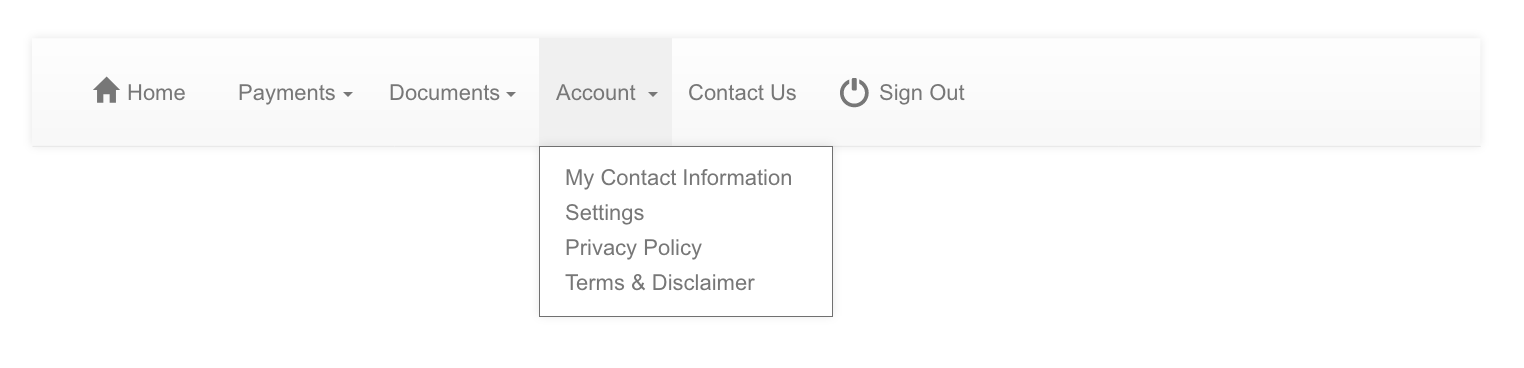
Contact Information
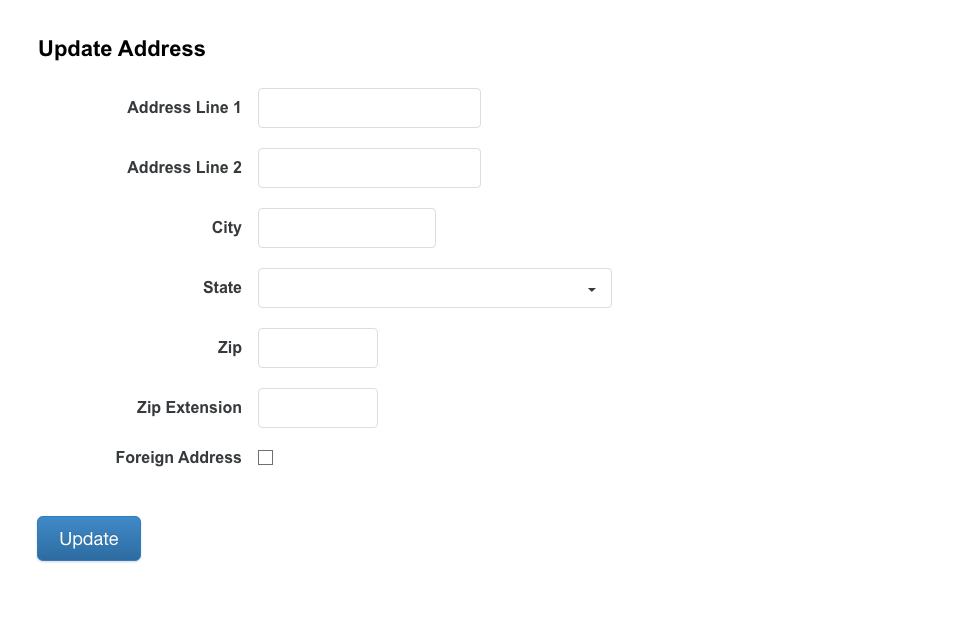
From the Account dropdown, you can update any of your contact information including Address, Phone Number, and Email Address. You cannot electronically update the name of the borrower — these requests must be submitted to cuscoperations@studentchoice.org.
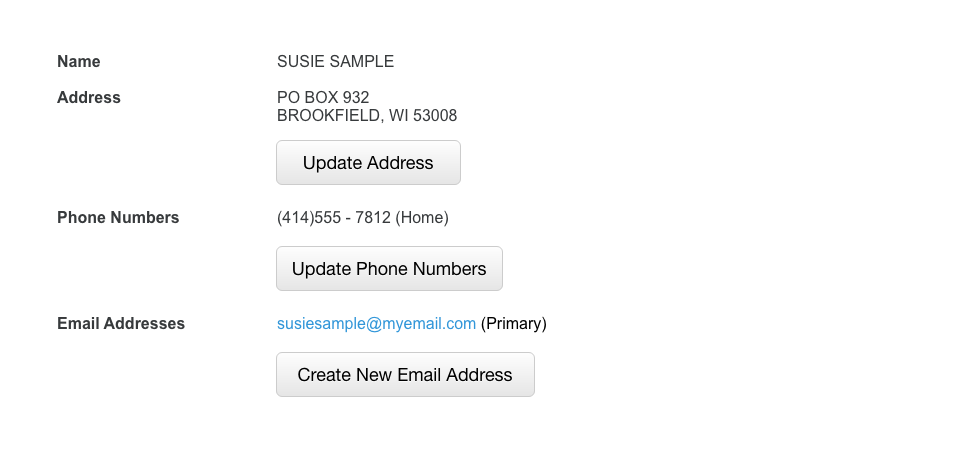
When updating your address, if you have a non-US residency, you’ll have to check the box, Foreign Address. After doing so, the form should change to include fields for Country, Province, and Foreign Postal Code. Fill out those fields accordingly and click Update.
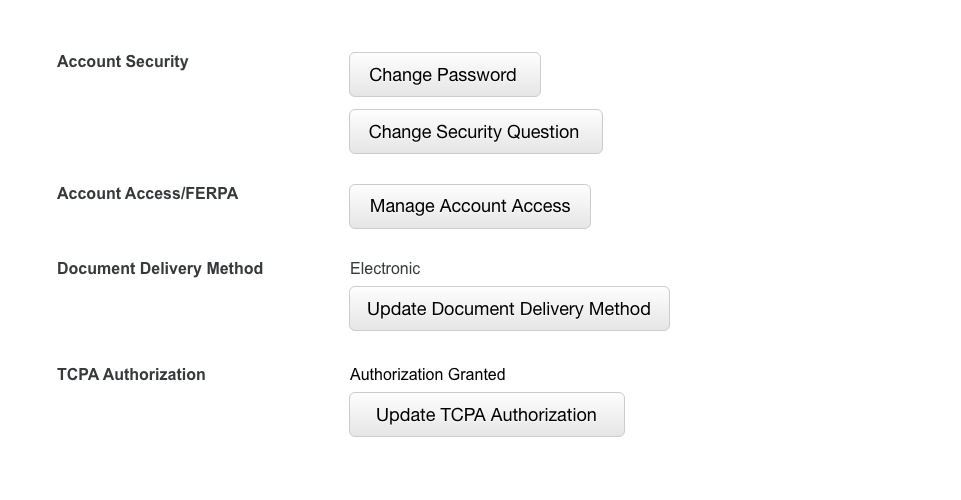
Settings
Under Settings, you can update your account preferences. There will be options to update account security information, manage account access, update or make changes to your initial document delivery method, and to update your selection for TCPA authorization.
Privacy Policy, Terms, & Disclaimers
The last options under the Account menu dropdown are for Privacy Policy and Terms & Disclaimer. If you need to review any official information, you can access them from here.
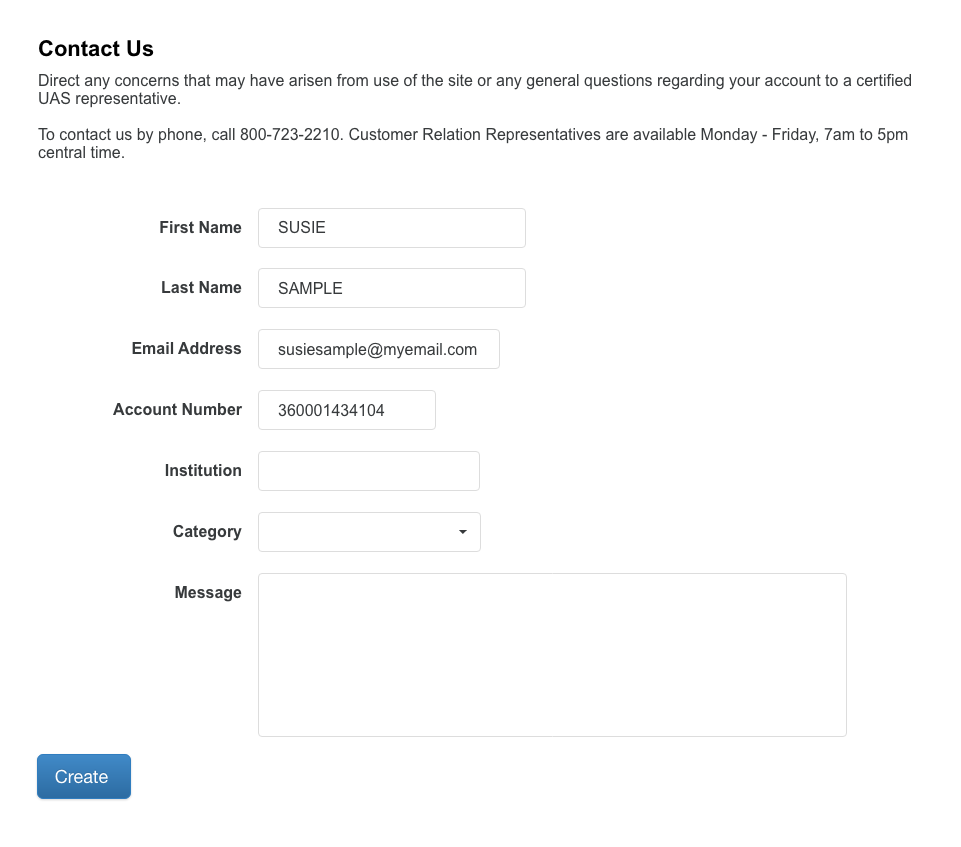
Contact
Get In Touch
If you have any questions or inquiries, you can go to Contact Us. Fill out the required fields in the contact form and then leave a detailed summary of your question or issue.
To contact Quorum directly about a student loan question, please email studentloans@quorumfcu.org. Customer Relation Representatives are available Monday – Friday, 8:00 a.m. — 6:00 p.m. ET.
Need personal assistance?
Email us at studentloans@quorumfcu.org.